
 Sales:
 Sales:
Backing up and restoring your website is crucial for safeguarding your data and ensuring business continuity. Here’s a step-by-step guide to backing up and restoring your website using cPanel:
Backing Up Your Website.
Step 1: Full Website Backup. (Best VPS provider)
Log in to cPanel:
– Access your cPanel account using your username and password.
Navigate to Backup Tool:
– Locate the Files section and click on Backup or Backup Wizard.
Using Backup Wizard:
– Click on Backup Wizard for a guided process.
– Click on Backup.
– Select Full Backup to back up your entire website.
– Choose a backup destination (Home Directory is common).
– Enter your email address to receive a notification when the backup is complete.
– Click Generate Backup to start the process.
Using Backup Tool:
– Click on Backup in the Files section. (Free Windows VPS Server)
– In the Full Backup section, click Download a Full Website Backup.
– Choose the backup destination and provide your email for notifications.
– Click Generate Backup.
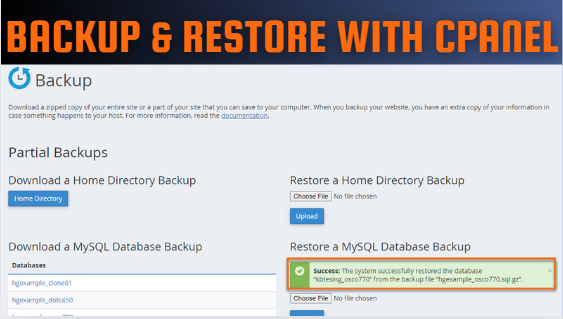
Step 2: Partial Backups.
Navigate to Backup Tool:
– Go to the Backup tool in the Files section.
Home Directory Backup:
– Click on Home Directory under Partial Backups.
– Click Download to save a backup of your home directory.
MySQL Database Backup:
– Under Partial Backups, find Download a MySQL Database Backup.
– Select the database you want to back up and click Download.
Email Forwarders and Filters Backup: (Best Web Hosting in India)
-Click on Email Forwarders and Email Filters to back up these settings.
Restoring Your Website.
Step 1: Full Website Restore.
Log in to cPanel:
– Access your cPanel account using your username and password.
Navigate to Backup Tool:
– Locate the Files section and click on Backup or Backup Wizard.
Using Backup Wizard:
– Click on Backup Wizard.
– Click on Restore.
– Select the type of backup you want to restore (Home Directory, MySQL Databases, or Email Forwarders/Filters).
– Upload the backup file from your local machine. (Low cost VPS hosting)
Using Backup Tool:
– Click on Backup in the Files section.
– In the Restore a Home Directory Backup section, click Choose File and select your backup file.
– Click Upload to start the restoration process.
Step 2: Partial Restores.
Navigate to Backup Tool:
– Go to the Backup tool in the Files section.
Home Directory Restore:
– Under Restore a Home Directory Backup, click Choose File.
– Select the backup file and click Upload.
MySQL Database Restore:
– Under Restore a MySQL Database, click Choose File.
– Select the backup file and click Upload.
Email Forwarders and Filters Restore: (dedicated server hosting)
– Under Restore Email Forwarders/Filters, click Choose File.
– Select the backup file and click Upload.
Additional Tips:-
Regular Backups: Schedule regular backups to ensure you always have a recent copy of your website.
Store Backups Securely: Keep backup files in a secure location, separate from your primary server, such as cloud storage or an external hard drive.
Test Restores: Periodically test the restore process to ensure your backups are valid and can be restored successfully.
By following these steps, you can effectively back up and restore your website using cPanel, ensuring your data is protected and can be quickly recovered in case of any issues. (Free VPS Provider in India)