
 Sales:
 Sales:
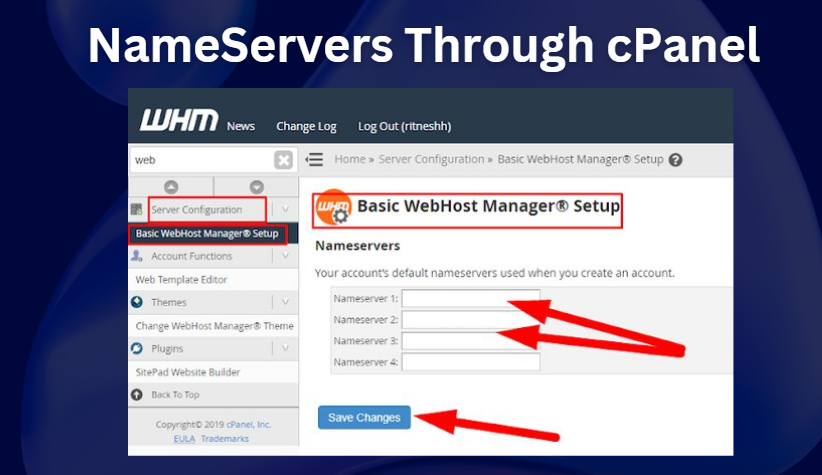
How to Create Name Servers Through cPanel, Creating name servers through cPanel is a fundamental skill for managing web hosting effectively. In 2024, with the increasing need for personalized and reliable web hosting services, understanding how to set up name servers can significantly enhance your control over your domain and hosting environment. This guide will walk you through the process, providing detailed steps and explanations to ensure you can efficiently create and manage name servers using cPanel.
Understanding Name Servers
Definition and Importance
How to Create Name Servers Through cPanel, Name servers are specialized servers on the internet that handle queries regarding the location of a domain name’s services. They play a crucial role in directing traffic on the internet, ensuring that users can access websites using domain names instead of IP addresses. Understanding the function and importance of name servers is the first step in mastering web hosting management.
How Name Servers Work
How to Create Name Servers Through cPanel, When a user enters a domain name in their browser, the query is sent to a name server to resolve the domain into an IP address. This process involves multiple steps, including querying the root servers, top-level domain (TLD) servers, and the authoritative name servers for the domain. The efficiency and reliability of name servers directly impact website accessibility and performance.
Preparing for Name Server Creation
Prerequisites
Before creating name servers, ensure you have:
- A registered domain name.
- Access to cPanel for your web hosting account.
- Basic understanding of DNS records and their types.
Accessing cPanel
How to Create Name Servers Through cPanel, To access cPanel, log in to your web hosting account and navigate to the cPanel dashboard. The dashboard provides various tools and options for managing your web hosting environment.
Step-by-Step Guide to Creating Name Servers in cPanel
Accessing the DNS Zone Editor
- Log in to cPanel: Use your credentials to log in to cPanel.
- Navigate to DNS Zone Editor: Find the DNS Zone Editor in the Domains section.
- Select Your Domain: Choose the domain for which you want to create name servers.
Creating the Necessary DNS Records
- Add A Records: Create A records for your name servers, pointing them to the server’s IP address.
- Example:
ns1.yourdomain.com -> IP Address
- Example:
- Add NS Records: Define the name servers for your domain.
- Example:
yourdomain.com -> ns1.yourdomain.com, ns2.yourdomain.com
- Example:
Configuring Name Servers for Your Domain
Updating Domain Registrar Settings
- Log in to Your Domain Registrar: Access your domain registrar’s control panel.
- Update Name Servers: Change the name servers for your domain to the ones you created in cPanel.
- Example:
ns1.yourdomain.com,ns2.yourdomain.com
- Example:
- Save Changes: Ensure the changes are saved and propagated.
Verifying Name Server Configuration
- Use DNS Lookup Tools: Verify the new name servers are active using DNS lookup tools.
- Check Propagation Status: Confirm that the DNS changes have propagated worldwide, which can take up to 48 hours.
Troubleshooting Common Issues
Common Errors and Solutions
- Error 1: DNS Records not resolving
- Solution: Verify the accuracy of your DNS entries and IP addresses.
- Error 2: Propagation delays
- Solution: Allow up to 48 hours and check periodically.
Tips for Avoiding Common Pitfalls
- Double-check DNS entries before saving.
- Ensure there are no typos in the domain names and IP addresses.
- Regularly monitor your DNS settings for any unexpected changes.
Advanced Name Server Configurations
Setting Up Custom Name Servers
How to Create Name Servers Through cPanel, Custom name servers offer greater control over your domain’s DNS settings. To set up custom name servers:
- Create Glue Records: Register your custom name servers with your domain registrar.
- Example:
ns1.yourdomain.com -> IP Address
- Example:
- Update cPanel Settings: Configure your custom name servers in cPanel.
Integrating with Third-Party DNS Services
Using third-party DNS services can enhance performance and reliability. Integrate third-party DNS by:
- Setting Up DNS Records in the Third-Party Service: Replicate your DNS records in the external service.
- Update Name Servers: Change the name servers at your domain registrar to those provided by the third-party service.
Security Considerations
Securing Your Name Servers
- Use Secure DNS (DNSSEC): Implement DNSSEC to protect against DNS spoofing and other attacks.
- Regular Updates: Keep your server software and DNS configurations updated to mitigate vulnerabilities.
Best Practices for Name Server Security
- Limit Access: Restrict access to your DNS management tools.
- Regular Audits: Conduct periodic audits of your DNS settings and configurations.
Monitoring and Maintenance
Regular Monitoring Techniques
- Use Monitoring Tools: Employ DNS monitoring tools to track the performance and uptime of your name servers.
- Log Analysis: Regularly review DNS logs for any suspicious activity or errors.
Maintenance Best Practices
- Scheduled Maintenance: Plan regular maintenance windows to update and optimize your DNS settings.
- Backup Configurations: Always back up your DNS settings before making significant changes.
Benefits of Custom Name Servers
Enhanced Control
How to Create Name Servers Through cPanel, How to Create Name Servers Through cPanel, Custom name servers provide greater control over your DNS settings, allowing for tailored configurations and optimizations specific to your domain’s needs.
Improved Performance and Reliability
With custom name servers, you can optimize performance through load balancing and redundancy, leading to improved reliability and faster response times.
Case Studies and Real-World Examples
Successful Implementations
How to Create Name Servers Through cPanel, Explore case studies of organizations that successfully implemented custom name servers, highlighting the benefits and challenges faced during the process.
Lessons Learned from Name Server Configuration
How to Create Name Servers Through cPanel, Learn from the experiences of others, understanding the common pitfalls and best practices in configuring name servers.
Expert Insights and Tips
Advice from Industry Professionals
How to Create Name Servers Through cPanel, Gain insights from DNS and web hosting experts on best practices for managing and configuring name servers.
Common Mistakes to Avoid
Avoid common mistakes in name server configuration, such as incorrect DNS entries and inadequate security measures.
Frequently Asked Questions (FAQs)
Addressing Common Queries
- What are name servers?
- Name servers are servers that translate domain names into IP addresses, directing internet traffic.
- Why do I need custom name servers?
- Custom name servers offer enhanced control, security, and performance for your domain.
- How long does it take for DNS changes to propagate?
- DNS changes can take up to 48 hours to propagate worldwide.
Additional Resources
- Official cPanel Documentation: cPanel DNS Zone Editor
- DNS Monitoring Tools: DNSstuff, Pingdom
Conclusion
How to Create Name Servers Through cPanel, Creating and managing name servers through cPanel is a critical skill for any web hosting administrator. By following the steps outlined in this guide, you can effectively set up, configure, and maintain your name servers, ensuring optimal performance and reliability for your domain. Remember to stay updated with the latest practices and tools to keep your name servers secure and efficient.