
 Sales:
 Sales:
How to Integrate Cyber Panel with Cloud Flare, CyberPanel has recently launched a High Availability feature that requires a Cloudflare API to switch DNS if the main server goes down. By using your Cloudflare API, DNS will switch to the failover server, ensuring your sites remain online. Follow the article below to configure the Cloudflare API and start creating clusters.
How to Integrate Cyber Panel with Cloud Flare. What is Cloudflare?
How to Integrate Cyber Panel with Cloud Flare, In this way Cloudflare is a reverse proxy service offering several features:
- CDN (Cloud Delivery Network): By caching your website’s data and serving it from their nearest Point of Presence, load on your server decreases and bandwidth is saved.
- Network Gateway: Automatically translates between IPv4 and IPv6.
- SSL Provider: Issues a certificate for your domain on their server with one click, requiring zero changes on your server.
- WAF (Web Application Firewall): Sits between visitors and your server, blocking malicious traffic.
- App Installation: Allows direct installation of many apps without changing anything on your site.
1. Get an API key from Cloudflare:
For How to Integrate Cyber Panel with Cloud Flare, First log in to your Cloudflare account to get an API key. Visit Cloudflare to log in.

In the Cloudflare dashboard:
- Go to the Profile option on the right and click My Profile.
- In the top bar, click on API Tokens, then check the Global API Key in the Keys section below.
- Click the View button in front of the Global API Key.
- Provide your Cloudflare password when prompted, then press View.
- Copy the API key displayed in the prompt window and proceed to the next step.
2. Log in to CyberPanel Cloud:
How to Integrate Cyber Panel with Cloud Flare Go to CyberPanel Cloud, enter your login details, and log in to your account.
3. Configure your Cloudflare to CyberPanel Cloud:
Once logged in to your cloud account:

- In the top menu, go to Settings -> Cloudflare.
- On the Cloudflare screen, provide the required information:
- Name: Any name you want to give.
- API Key: The key you copied from the Cloudflare account.
- Email: A valid email address used in Cloudflare.
- After providing all the information, click the Create button.
How to Integrate Cyber Panel with Cloud Flare Below the Add API Key section, you can see already configured keys. You are now ready to create Highly Available Clusters.
Why do you need synchronization?
How to Integrate Cyber Panel with Cloud Flare, To use Cloudflare, the domain’s nameservers must be changed to those provided by Cloudflare. This means any changes, such as adding subdomains, changing mail providers, or using a new DKIM key on CyberPanel, must be manually inputted into Cloudflare’s DNS panel. This manual data entry can be tedious.
CyberPanel simplifies this by adding Cloudflare integration directly into CyberPanel.
What does CyberPanel Synchronization do?
CyberPanel has added deep integration with Cloudflare, automatically performing the following tasks on your behalf:

- Add, edit, or remove DNS records: Whenever you create a new DNS entry like for email, subdomains, or text verification, there’s no need to log in to your Cloudflare account to do it manually.
- Create necessary zone info and domain in Cloudflare: When you create a new website on CyberPanel, it checks if that domain exists in your Cloudflare account.
- If it is present, CyberPanel will create all the DNS records and copy them over to Cloudflare DNS records.
- If it isn’t present, CyberPanel will create the domain in Cloudflare with a basic free account and then create all the DNS records, copying them over to Cloudflare DNS records.
- Constant sync: If you change any records on CyberPanel or any record is missing from the Cloudflare account, this feature will update and/or populate the changes on your Cloudflare account.
Now, your CyberPanel and Cloudflare are seamlessly synchronized, ensuring your website’s DNS settings are always up to date without the need for manual intervention.
How to Use Cloudflare Integration
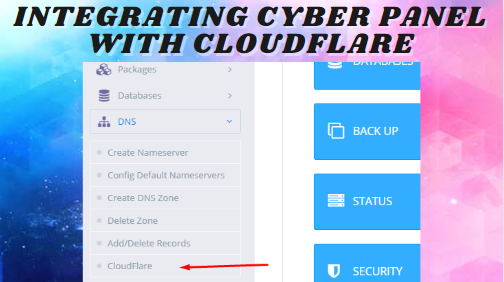
How to Integrate Cyber Panel with Cloud Flare, From version v1.9.5 onwards, you can use Cloudflare integration by navigating to DNS -> Cloudflare in CyberPanel. Here’s a step-by-step guide to help you through the process:
- Accessing the Integration:
- Go into DNS -> Cloudflare.
- You will be greeted by a screen with various options.
- Obtaining an API Token from Cloudflare:
- Click the avatar on the right of your Cloudflare account.
- Under the profile setting, click the API token tab.
- Click on the blue “View” button next to Global API Key.
- Enter your password to retrieve your API token key.
- Setting Up in CyberPanel:
- Enter the email address you use for your Cloudflare account.
- Input your Cloudflare API token generated in the previous step.
- On the Cloudflare setting page in CyberPanel, select “Enable” for Sync local Records to Cloudflare.
- Click save.
- Managing DNS Records:
- On the next screen, you can add, remove, or sync your DNS records between CyberPanel and Cloudflare.
In less than 10 minutes, we have successfully integrated Cloudflare with CyberPanel, making DNS updates a breeze directly from CyberPanel.
Handling DNS Synchronization with CyberPanel
How to Integrate Cyber Panel with Cloud Flare, As part of our server management service, Bobcares responds to all inquiries, no matter how big or small. Let’s take a closer look at how CyberPanel handles DNS synchronization:
- Limited Port Access:
- Only a few HTTP and HTTPS ports are allowed by Cloudflare. Without their paid plan, we can’t access ports 8090 (CyberPanel) or 7080 (OpenLiteSpeed WebAdmin). Here’s a workaround:
- Go to CyberPanel.
- Select “Create a Website.”
- Choose a random subdomain—something difficult for hackers to guess.
- Press the create button.
- Point the subdomain to the IP address in Cloudflare’s dashboard.
- Navigate to SSL -> Hostname SSL.
- Install a panel SSL.
- This way, we can use subdomain.domain_name.com:7080 instead of domain_name.com:7080, benefiting from Cloudflare’s CDN and securing our web panel.
- Only a few HTTP and HTTPS ports are allowed by Cloudflare. Without their paid plan, we can’t access ports 8090 (CyberPanel) or 7080 (OpenLiteSpeed WebAdmin). Here’s a workaround:
- Purpose of CyberPanel Synchronization:
- Add, edit, or delete DNS records: No need to log into Cloudflare for every new DNS entry.
- Create required zone information and domain in Cloudflare: CyberPanel ensures all DNS records are created and synchronized.
- Constant Sync: Changes made in CyberPanel are automatically updated in Cloudflare.
Integrating with Cloudflare – Detailed Steps
- Go to DNS and then Cloudflare.
- To get an API token from Cloudflare, go to your Cloudflare account and click the avatar on the right.
- Click the API token tab under profile settings.
- Click the blue “View” button next to Global API Key.
- Enter your password to obtain the API token key.
- Provide the email address associated with your Cloudflare account.
- Enter the generated Cloudflare API token.
- Select “Enable” for Sync local Records to Cloudflare.
- Click save.
- On the next screen, you can add, remove, or sync your DNS records between CyberPanel and Cloudflare.
[Looking for a solution to another query? We are just a click away.]
Conclusion
To sum up, our Support team demonstrates how CyberPanel effectively manages DNS synchronization. This integration simplifies your workflow, ensuring your DNS records are always up-to-date and securely managed.